User Instructions for Datagen’s Sophisticated
Stop Watch
Back
(Version 1.0.0.32)
Installation
The Installation takes place in two phases:
- Download and unzip the file dgs1032.zip
- Doubleclick the setup.exe file
and follow the instrutions on the screen
Program Start and Program Activation
If you installed the program in its default location you would start
the program with a click on START –> Program Files –> DG-Swatch –>
DG-Swatch. You will get to the
Program
Registration and Order Form. Fill out this form
and click on the appropriate button to transport the registration and order information to
Datagen or the vendor of this program. Be sure not to modify the Encrypted
Order Message. After a few minutes up to a maximum of 48 hours you will receive the
corresponding activation key for your registration. Then enter this key on the bottom of
the registration form. Close the form and, if the key is the correct one, your program
will be activated.
Since the program looks for some very specific information on your hard
disk where the program is installed you will not be able to transfer the program to
another disk. In order to do this you will need (for a small fee) a new re-activation key
for the program.
Utilization of the DG-Swatch Program
Stop Watch Functions
When you start the program you will see the main window of the
application (Figure 1) which contains all the function buttons of the stopwatch. The
actions of these buttons are as follows:
Note: The time is taken as soon as you click the left mouse button on
one of the stop watch buttons (mouse down, not mouse up as usual on command
buttons).
Start: Starts the stop watch and sets the stop watch counter to
zero. The absolute date and time is recorded on the log strip to the right.
Lap: With this button you can take as many intermediate times as
you want and the results are recorded on the log strip. The counter continues to run.
Pause: This button stops the counter and resumes counting as soon
as you press the Resume button. The event is recorded on the strip.
Resume: This button becomes active after you pressed the Pause
button. It resumes the counting of the time. The absolute time at which counting is
resumed is recorded on the strip.
Reset: This button becomes active, when you press either the Lap
button or the Pause button. It resets the stop watch counter to zero. There is no event
recorded on the strip. You can now start the stopwatch with the Start button.
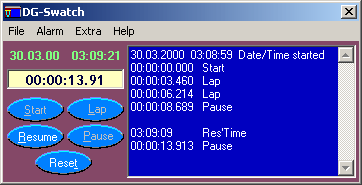 |
Figure 1:
Main window of DG-Swatch. On the upper left is the actual date/time. Below the display of
the stopwatch and below this the activation buttons for the stopwatch. The blue area on
the right is the recording strip for all the events of the stopwatch. From the menu you
have access to the various timer and alarm functions of the DG-Swatch. |
To clear the recording strip: On the Menu of the main window click
on Extra and then select Clear Log Strip.
To print the content of the strip: Click on the menu File and then
on Print Log Strip. You must have a valid printer installed on your computer.
Alarm Functions
The alarm functions are accessible
through the menu item Alarm – Absolute Time. In the present version you can set two
different alarm times: Alarm 1 and Alarm 2. Selecting one of the alarms displays the
window as shown in Figure 2.
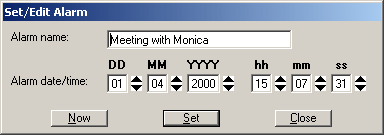 |
Figure 2:
Set Alarm 1. |
In the top text box you can enter the name of the Alarm such as
‘Pick up Jessica from school’. Below you enter the date and time when the alarm
should ring.
Please note: When you close the DG-Swatch application and even turn off
your computer, the alarm and timer data are stored in a database on your hard disk. When
your turn on your computer and start the DG-Swatch, the Alarm and Timer will continue. Of
course, neither the alarms nor the timers can ring when they reach the preset time when
the application is not running, but, as soon as you start DG-Swatch, the Alarms and Timers
will be checked for their destination time and ring correspondingly – maybe too late!
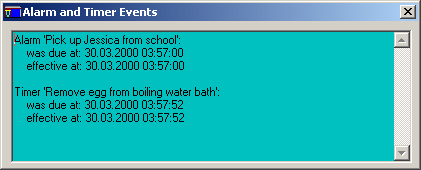 |
Figure 3:
The events window. |
When a timer or alarm reaches its destination time, you should hear a
ring and the event window of the application should pop up or at least blinks on the task
bar. The alarm/timer name and other info will be reported in the event window as shown in
Figure 3. You can close the event window and re-open it any time when you click on menu
item Extra and select Show Events Window.
Timer Functions
Timers have similar functions as Alarms except that you don’t
specify the absolute destination date/time but the relative time to go, e.g. the number of
minutes you want to take a brake. The sound of the ring for the timer should be a little
bit different than the sound for the alarm.
Exit
On the File menu select Exit. The alarm and timer data as well as the
position of the main window will be recorded in a database.
Concluding Remarks
There are many additional functions that could be included in this
application. Please check from time to time our home page for free upgrades. If you
have problems or even suggestions of improving this application, please let us know, as we
will consider them to include in the next version.
Werner Venetz
Datagen Ltd
Gewerbestrasse 18
CH-4123 Allschwil
Tel. +41 61 481 0380
Fax.: +41 61 487 9501
Email: info@datagen.net
Web: http://www.datagen.net
Back Top